Wednesday, December 30, 2009

This Year's Going To Be Different


I know I am sure you have heard that before, maybe you have even said it, but seriously this year is going to be different. I am going to make my goals and stick with them. Check back with me on January 1, 2011 and congratulate me or not.


Goals:

1. Lose enough weight to just feel good about myself. Whether it is 5 pounds or 30 I am going to lose it til I feel good.

2. Eat more nutritiously. I can't cut out flavor and taste all together so I figure I can make one "bad" meal a week and then eat healthier for the rest. Sound good?

3. Stop judging or gossiping. I tend to justify the two by saying I am merely observing or just relaying information that happens to be "juicy." Enough is enough right?! No more excuses this time is for real.

4. Budget and save. This is the year where I think things will be the most tight. My husband works for the city of Phoenix and there is now talk of laying off firefighters. Sounds scary, but I feel a greater hand is in all things. Even if we still have employment I would really like to not spend as much.

5. Worry less, laugh more. So simple yet so hard.


Let's stop while they still seem attainable. What are your goals for 2010?

Thursday, December 24, 2009

Merry Christmas!


I had a lot of fabulous neighbors and not a lot of money for gifts. I threw this together and wish that I had been clever enough to make it more pretty. It is a bottle of Sprite with two bags of popcorn tied on, and a card. On the card I wrote:

Just "POP"ped by to wish you Happy Holidays! May your Christmas be merry and "SPRITE!"


It is very simple, but easy to top next year when I decide which neighbors I really want to splurge on. I sure hope if you are reading this you know how much you have made my year Merry and Bright! Happy Holidays!

Wednesday, December 16, 2009

Chocolate Cake Is Always In Season


Right?
My sister made this recently and I just had to share. I will say that she spent about 40 dollars on ingredients because she used expensive cocoa. You can find higher quality at your local whole foods or specialty stores. If you are going to take the time to make such a creation, you should splurge on some good cocoa. It just melts in your mouth. Nothing like a sister to make my favorite meal. Nice sisters and good chocolate cake just go together. Yum!


Ingredients

3 1/2 cups all-purpose flour
2 cups good cocoa powder
1 tablespoon baking soda
1/2 teaspoon kosher salt
1 1/2 cups (3 sticks) unsalted butter, at room temperature
1 1/3 cups granulated sugar
1 1/3 cups light brown sugar, packed
4 extra-large eggs, at room temperature
4 teaspoons pure vanilla extract
2 cups buttermilk, at room temperature
1 cup sour cream, at room temperature
1/4 cup brewed coffee

Preheat the oven to 350 degrees F.

Butter 1 (4 by 3-inch) cake pan, 1 (6 by 3-inch) cake pan and 1 (8 by 3-inch) cake pan. Line the bottoms with parchment paper, and butter and flour the pans.

Sift the flour, cocoa, baking soda, and salt together in a medium bowl.

In the bowl of an electric mixer fitted with a paddle attachment, cream the butter and sugars on high speed until light, approximately 5 minutes. Add the eggs and vanilla and mix well. Combine the buttermilk, sour cream, and coffee. On low speed, add the flour mixture and the buttermilk mixture alternately in thirds, beginning with the buttermilk mixture and ending with the flour mixture. Mix the batter only until blended.

Divide the batter between the 3 pans and smooth the tops with a spatula. Bake on the middle rack of the oven as follows: for the 4-inch pan 45 to 50 minutes, or until a toothpick comes out clean; for the 6-inch pan 70 to 75 minutes, or until a toothpick comes out clean; and for the 8-inch pan 85 to 90 minutes, or until a toothpick comes out clean. Cool the cakes in the pans for 10 minutes each on a cooling rack, carefully remove from the pans and allow to finish cooling.

Place the 8-inch cake on a serving plate, flat side up. Frost the top of that layer with buttercream. Place the 6-inch cake in the center of the top of the 8-inch cake, flat-side up, and frost the top and sides. Place the 4-inch cake in the center of the top of the 6-inch cake, flat side down. Frost the top and sides of that layer with buttercream. Spread any remaining buttercream over the cake evenly.

Chocolate Buttercream Frosting:

1 pound bittersweet chocolate
12 ounces semisweet chocolate
3/4 cup egg whites (4 to 5 extra-large eggs), at room temperature
1 1/2 cups granulated sugar
1/4 teaspoon cream of tartar
3/4 teaspoon kosher salt
1 1/2 pounds unsalted butter, at room temperature
3 teaspoons pure vanilla extract

Chop the chocolates and place them in a heat-proof bowl set over a pan simmering water. Stir until melted and set aside until cooled to room temperature.

Mix the egg whites, sugar, cream of tartar, and salt in the bowl of an electric mixer fitted with a whisk attachment. Place the bowl of egg whites over the pan of simmering water and heat the egg whites until they are warm to the touch, about 5 minutes. Return the bowl to the electric mixer and whisk on high speed for 5 minutes, or until the meringue is cool and holds a stiff peak.

Add the butter, 1 tablespoon at a time, while beating on medium speed. Scrape down the bowl, add the melted chocolate, vanilla,and mix for 1 minute or until the chocolate is completely blended in. If the buttercream seems very soft, allow it to cool, and beat it again.

Spread on cake, serve, and enjoy!

Thursday, December 10, 2009

Turkey Brine Won't You Be Mine?


I can't remember what my Turkey tasted like before we discovered turkey brine. It is no secret now, but turkey brine is the new black. Ever stressed about making the perfect turkey? All you need is a little brine and an oven bag!

Here is my Brine Recipe:

1 turkey
1 gallon ice cold water
1 cup kosher salt (or more if you like it salty)
1/2 cup light brown sugar
3 bay leaves, crumbled
1 tablespoon allspice berries, crushed
1 tablespoon mixed or black peppercorns, crushed
1 Tablespoon dried rosemary
1 Tablespoon dried sage
1 Tablespoon dried thyme
1/2 cup vegetable oil
salt and pepper
Creole seasoning, optional
1 gallon of iced water (approx)

Directions:

I have done this both ways. You can combine all of the ingredients minus the water and creole seasoning into a pot and simmer until salt is dissolved. Or you can skip that and just combine all of the ingredients into a turkey oven bag surrounding the turkey and add iced water until covered. You will also need to add iced water to the boiled mixture if you choose that route after simmering. Place turkey in fridge for 24 hours with brine. Before cooking, remove Turkey from bag and pat dry. Add more vegetable oil to turkey and sprinkle with salt, pepper, and creole seasoning. Cook as directed according to size. I place my turkey in yet another oven bag and tie with a twist tie. This helps the turkey to be tender and juicy. Serve and Enjoy!

Saturday, December 5, 2009

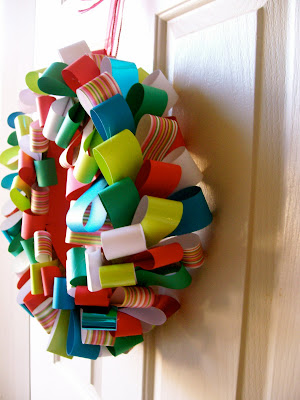
Merry and Bright


I need to thank IDEAS and Razzle Dazzle Crafting for the inspiration for this wreath. At my house we are poor.


I mean that in a non "poor me" sort of way because my husband works two jobs so that I can be home with the wee one. This is the first Christmas in our four years of marriage that we have been able to decorate a little bit and have a tree. I love BRIGHT colors and started collecting ornaments and such a few years ago and have been waiting to be able to put it all together. I was able to get this tree because of the post Christmas sales last year. I wish you could see the tree in all of it's glory, but the bright pinks, greens, and blues are so fun.

I am so thrilled with how MERRY AND BRIGHT my home is. It feels like the Christmas season. This wreath was super and cheap and easy. I used bright colored scrapbook paper and actually glued it on an old straw wreath of all things to make it more modern. Bright colors are not super traditional, but I am loving the unique look.

Wednesday, December 2, 2009

Much Ado About a Cookie


How much do you love baking this time of year?! I sure do. The tree is up and the house is decorated. It is now time to fill the house with lovely cooking aroma. This cookie is delicious! It is a yummy creamy frosting surrounded by the perfectly delicate cookie on each side. You can pick your flavoring for the center or just go with the basic vanilla cream.

The "perfectly delicate cookie on each side is the problem". With all the tender loving care in the world I couldn't get this to be any better looking. Don't be fooled by my sad pictures. They are delicious! Santa might come back in the same night if you put these out! The directions seem pretty simple, but watch out when scraping them off the cookie sheet. If some of them crumble like some of mine did, it's ok. They melt in your mouth anyway.

Cream Wafers

Ingredients:
1 cup butter
2 cups flour
1/3 cup whipping cream
granulated sugar to roll in ( about 1/2 a cup)


Mix butter, cream and flour thoroughly. Chill 1 hr. Heat oven to 375. Roll dough on floured surface ( I add more flour to to dough when I roll it out as it is too sticky) to 1/8" thick. On a small plate place sugar and roll both sides of cookie in it and then place on greased cookie pan. Prick each cookie in 4 places with fork. Bake 7 -9 min or until slightly puffy. Put two cooled cookies together with filling in between.

Filling: Your basic butter frosting with almond, lemon, orange, mint or just vanilla flavoring. Whichever you prefer. I usually divide frosting in two dishes and use two different flavorings and food coloring to match. In this picture is almond flavoring with green food coloring. Serve and enjoy. Good luck!

Raw Spice Bar

Raise your hand if you love to cook, but find yourself just finishing up your 8,987th meal and you are fresh out of ideas. Just me?  I h...