Showing posts with label Tasty Treats. Show all posts

Tuesday, August 3, 2010

Morning Sickness Brownie Dessert


Thank you so much for your support in the joy of motherhood and pregnancy. I realize I am not the first or the last to suffer from the symptom of morning sickness and therefore should not be given any extra sympathy. However, it is such a peculiar problem. On one hand it gives me the joyful reminder that there is a baby growing and developing inside of me. On the other hand I have to ask why does this have to be a possible side effect to the greatest gift on earth? While I am on the subject, why the strong sense of smell? Isn't that just uncanny to have a terrific nose and a queasy stomach? Either way it is humbling and heaven knows I am always in need of that.

In a world of so many advances ie; "There's an APP for that!". Sadly there isn't an IPhone App for morning sickness. There doesn't seem to be a cure anywhere. That truly is OK. However, for someone who loves food so much it is hilarious to me and I am sure annoying to others ( spouse mostly) how much I do not like food now. My own little cure seems to be sweets and fried foods. Besides the obvious problems with that, the looming threat of gestational diabetes makes me hope this doesn't last. While I look forward to feeling good again, I will revel in my sweets and try to share them with you.

This is a new favorite at my house. While it is so easy even a lazy pregnant person can make it, it tastes as though your favorite sit down restaurant just made it and charged you an arm and a leg for it. You can make it and feed about 6-8 people for about 6 dollars total.

Sure you can find a recipe for Cheesecake brownies. Might I suggest just using this:

Make as directed and while the brownies are slightly cooling prepare your Cook and Serve chocolate pudding that looks like this:
You just follow the directions by mixing the contents with two cups of milk and stirring while it comes to a boil. It thickens as it boils. I like to keep it fairly thin in consistency so when it comes to a boil I take it off the burner quickly. Serve up one slice of brownie (generous if you are giving it to me), top with one scoop of vanilla ice cream (before my current state I made this with homemade vanilla ice cream), and top with the hot fudgy sauce.

Let me tell you how impressed my visitors have been with this treat. It looks simple because it is, but it tastes divine. The hot pudding sauce melts through the ice cream just enough to compliment the brownie with the perfect creaminess of flavor. Sounds too sweet? No way! With the cheescake topping to the brownie it is a perfectly well rounded dessert! It is my husband's new favorite dessert as well as for baby #2! Serve and enjoy!

Sunday, June 13, 2010

Red Velvet Cupcakes and a Little Dirty Secret


The husband recently turned one year older and requested red velvet cupcakes. Should I be worried? I don't think so. I think he just likes the taste and the color red. I searched for what I thought would be a good recipe and found a great one. This recipe has been modified from Best Cupcake Recipes.

Are you ready for the little dirty secret? It isn't really dirty. Actually, it is quite tasty. Do you over pull gorgeous cupcakes out of the oven only to have them deflate and sink minutes later when cooling? Well, I read somewhere that if you simply do a heaping teaspoon, or a heaping of whatever measurement the recipe calls for, your cupcakes will stay plump and risen. I tried it with this recipe and it worked!

I also couldn't decide if I should do a butter cream frosting or cream cheese frosting. I love the sharp flavor of cream cheese frosting, but feel that red velvet cupcakes lack in sweetness and need butter cream frosting as well. So, I combined them and it was delicious!

These are just in time for the 4th of July if you add blue sprinkles on top!


Red Velvet Cupcakes
2 1/2 cups cake flour
1 teaspoon baking powder (heaping)
1 teaspoon salt
2 tablespoons unsweetened cocoa powder
2 oz. red food coloring (two bottles)
1/2 cup unsalted butter, softened
1 1/2 cups sugar
2 eggs, at room temperature
1 teaspoon vanilla extract
1 cup buttermilk, at room temperature
1 teaspoon white vinegar
1 teaspoon baking soda

Directions:
1. Preheat oven to 350 degrees. Line two 12-cup muffin tins or silicone pans with cupcake liners.

2. Mix cake flour, baking powder, and salt into a medium bowl and set aside.

3. In a large bowl, using a hand mixer or stand mixer, beat butter and sugar together until light and fluffy, about three minutes. Beat in eggs, one at a time, then beat in vanilla and the cocoa powder, scraping down the bowl with a spatula as you go. Add one third of the flour mixture to the butter mixture, beat well, then beat in half of the buttermilk. Beat in another third of flour mixture, then second half of buttermilk. End with the last third of the flour mixture, beat until well combined, making sure to scrape down the bowl with a spatula. Add red food coloring until mixture is a vibrant red.

4. In a small bowl, mix vinegar and baking soda. Be careful as it will fizz so don't do it in a shallow bowl. Add vinegar mixture to the cake batter and stir well to combine. Fill cupcake cups with cake batter until they are a little under 3/4 full. I ended up with 24 cupcakes. Place muffin tins in your preheated oven. Bake for approximately 15-20, rotating pans halfway through. The cupcakes are done when you are able to pat the tops and the cake springs back up. If it sinks down they are not yet complete.

5. Cool the cupcakes in their tins on a wire rack for 10 minutes then remove and allow to cool completely before frosting.

6.I made half a batch of cream cheese frosting and half a batch of butter cream frosting and combined them for one delicious frosting. Serve and enjoy!

(Notice how they are still plump after cooling?)

Thursday, April 22, 2010

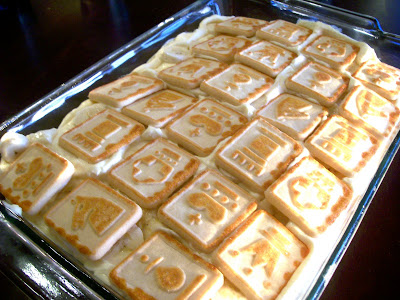
Not just Any Banana Pudding

Have you seen my winner? She is about this tall, this pretty, and I have only met her once through her one comment. Her profile is blocked so it seems that I am unable to locate her blog to contact her. Is there any tricks to find someone through their comment even if their profile is blocked? I am afraid I will have to choose another winner on Monday if I do not hear from EIGHT FOR ETERNITY.


Now have a bite of my banana pudding please. Once upon a time I made some for the fire station my husband was at and now he is known as the guy with the amazing dessert. I am not kidding. He is so new as a fire fighter that he "roves" from station to station. He is hopefully getting a reputation as a great worker and firefighter, but we know for sure he has gained the reputation for having a secret recipe of a really tasty dessert. Well secret is out! Here it is, no fire department needed.

Ingredients:
1 5oz. pkg instant vanilla pudding
2 cups milk
1 8oz. pkg cream cheese (softened)
1 can eagle brand condensed milk
2 cups whipping cream (whipped stiff with 1/4 cup of sugar)
2 pkgs pepperidge farm chessmen cookies
4-5 bananas sliced

Directions:
Mix pudding with milk using mixer and set aside. Mix in cream cheese. Mix in condensed milk and fold in whipped cream using spatula. Place 1 pkg of cookies on the bottom of a 9 x 13 pan. Add sliced bananas over cookies and spread the pudding mixture over the bananas. Place the second pkg of cookies over the top. Chill for 3-4 hours. Serve and Enjoy.

Serve immediately as the bananas turn brown quickly.

Thursday, March 25, 2010

Spring Cupcake Bouquet


This is super fun to make and even more delightful to give to someone. Before I became a mom, I was a dental assistant in a pediatric dental office. It was a really fun job, but the people I worked with are what really made it great. I have remained really good friends with one person in particular and today was her birthday. A perfect occasion for a cupcake bouquet. Here's how:


Find terra cotta planting pot with Styrofoam ball that will fit as pictured. There are several sizes to choose from, I chose the largest.I got mine at Michael's, but am sure you could get them cheaper at Wal-mart or even Home Depot. Cut up assorted colors of scrapbook paper and mod podge the entire pot. This is the best part. I added ribbon on the rim just because.


I had to trim the ball a bit in order for it to fit nice and snug.


I used confetti cupcake mix (Duncan Hines), but in the future will probably try to get a little fancy with the taste. The project itself took a few hours so an easy cake mix worked best for me. You can use popsicle sticks found at a craft stores to stick the cupcakes into the styrofoam. I used skewers cut in half just because I had them around. Stick them into the ball as desired. I was able to fit 14 cupcakes, but wish that I had put more in. Using a hot glue gun place tissue paper to cover up the rest of the styrofoam.


The final step is to frost the cupcakes. You get could really fancy with this part. I just used the sea shell frosting tip and a dash of sprinkles on each one. The thing about this project is you could go really simple or really make it fancy ,and either way it would still look great.

Tips:
  • The styrofoam ball was about 20 dollars at Michael's. I wouldn't go without their weekly 40% off coupon.
  • I used some card stock and some just regular scrap book paper. I would recommend only using the flimsy scrap book paper. It sticks better.
  • Before frosting check for hot glue strings all over.If you are going to give it to someone, give it to someone you really like because after all the time you put into it, you will hate to see it go.
It sure made my kitchen look lovely for a day. Let me know if you try it. I would love to see what people come up with.

Monday, February 15, 2010

I HEART vanilla bean cheesecake bars!


How does one humble wife let their dear husband know how much they love them? By vanilla bean cheesecake bars of course! I can't take all the credit. I wanted to make vanilla cheesecake, but I wanted it to be easy and in a large pan so I could use my heart-shaped cookie cutter. Thanks to Baking Bites I found just what I needed. I made a few adjustments and they really truly won the love of my husband and I.

Vanilla Cheesecake Bars

Ingredients (crust):
1/3 cup Sugar
1 1/2 cups Flour
1/2 cup Butter
1/2 cup Crushed Pecans (this is my addition because I had some)
1/4 teaspoon Salt
1/4 teaspoon Vanilla extract ( vanilla sugar would of been better, but I was doing it inexpensively)

Preheat oven to 350F. Lightly grease a 9×13-inch baking pan (or used the Baker’s Edge).
Begin by making the crust. In a large bowl, cream together sugar and butter, until smooth and fluffy. Working at a low speed, gradually beat in flour, pecans ,and salt until mixture is crumbly. Press evenly into prepared pan and bake for 15-17 minutes. While crust is baking prepare filling.

Ingredients:
1/2 cup of sugar
1/2 cup of half and half or light cream
2 (8oz.) pkgs of cream cheese
3 large eggs room temperature
1/2 vanilla bean or 2 teaspoons vanilla extract. ( I went to purchase vanilla bean and decided it was too pricey)
1 Tablespoon all purpose flour.

Directions:
Combine sugar, half & half and cream cheese in the bowl of a food processor and process until smooth. Add in eggs one at a time, waiting until each in incorporated before adding the next. Scrape the seeds from the vanilla bean into the mixture (or add extract) and add the flour. Pulse until smooth.
Pour the filling over the hot crust when it has finished baking. Return pan to oven and bake for 23-26 minutes, until the filling is set (baking time should be reduced slightly if using a 9×13-inch, as the filling will be slightly thinner) and not jiggly.
Cool completely before slicing (don’t be alarmed if the cheesecake appears to deflate somewhat as it cools), or refrigerate until ready to serve.
Makes 20-24 bars.
Once cooled I used my heart-shaped cookie cutter and topped with whipped cream, bananas, and strawberries.


It never hurts to show the neighbors some love and give them a slice too! I almost hoped they weren't home so there was more for me. My thighs thank them for being home.

Tuesday, January 26, 2010

Andes Mint Cookies


I can't tell you how I made these. I made these the other day for my family and they were such a hit that I fear that If I share the recipe I will no longer be the coolest person in the world. I will have to share that title with all that ventures to make these!.........Ok I will, but just because I am feeling generous.

Ingredients:

1 cup of Andes Creme De Menthe baking chips (I used less, you can use more depending on your craving for mint)
1 box of Duncan Hines Devils Food cake mix
1/3 cup of oil
1/3 cup of water
1 egg
20 whole Andes mints cut in half

Directions:

Mix all ingredients. Take one spoonful of mixture and roll into balls. Place on cookie sheet and bake for 10-15 minutes depending on oven. This part gets a little tricky to cook them not too gooey, but not too done. While cookies are baking cut whole Andes mints in half. As soon as you pull the cookies out of the oven place mint on center of cookie and spread chocolate around as it melts as if it were frosting. Serve with a tall glass of cold milk and grab as many you can at the first serving because they go fast!


Wednesday, December 16, 2009

Chocolate Cake Is Always In Season


Right?
My sister made this recently and I just had to share. I will say that she spent about 40 dollars on ingredients because she used expensive cocoa. You can find higher quality at your local whole foods or specialty stores. If you are going to take the time to make such a creation, you should splurge on some good cocoa. It just melts in your mouth. Nothing like a sister to make my favorite meal. Nice sisters and good chocolate cake just go together. Yum!


Ingredients

3 1/2 cups all-purpose flour
2 cups good cocoa powder
1 tablespoon baking soda
1/2 teaspoon kosher salt
1 1/2 cups (3 sticks) unsalted butter, at room temperature
1 1/3 cups granulated sugar
1 1/3 cups light brown sugar, packed
4 extra-large eggs, at room temperature
4 teaspoons pure vanilla extract
2 cups buttermilk, at room temperature
1 cup sour cream, at room temperature
1/4 cup brewed coffee

Preheat the oven to 350 degrees F.

Butter 1 (4 by 3-inch) cake pan, 1 (6 by 3-inch) cake pan and 1 (8 by 3-inch) cake pan. Line the bottoms with parchment paper, and butter and flour the pans.

Sift the flour, cocoa, baking soda, and salt together in a medium bowl.

In the bowl of an electric mixer fitted with a paddle attachment, cream the butter and sugars on high speed until light, approximately 5 minutes. Add the eggs and vanilla and mix well. Combine the buttermilk, sour cream, and coffee. On low speed, add the flour mixture and the buttermilk mixture alternately in thirds, beginning with the buttermilk mixture and ending with the flour mixture. Mix the batter only until blended.

Divide the batter between the 3 pans and smooth the tops with a spatula. Bake on the middle rack of the oven as follows: for the 4-inch pan 45 to 50 minutes, or until a toothpick comes out clean; for the 6-inch pan 70 to 75 minutes, or until a toothpick comes out clean; and for the 8-inch pan 85 to 90 minutes, or until a toothpick comes out clean. Cool the cakes in the pans for 10 minutes each on a cooling rack, carefully remove from the pans and allow to finish cooling.

Place the 8-inch cake on a serving plate, flat side up. Frost the top of that layer with buttercream. Place the 6-inch cake in the center of the top of the 8-inch cake, flat-side up, and frost the top and sides. Place the 4-inch cake in the center of the top of the 6-inch cake, flat side down. Frost the top and sides of that layer with buttercream. Spread any remaining buttercream over the cake evenly.

Chocolate Buttercream Frosting:

1 pound bittersweet chocolate
12 ounces semisweet chocolate
3/4 cup egg whites (4 to 5 extra-large eggs), at room temperature
1 1/2 cups granulated sugar
1/4 teaspoon cream of tartar
3/4 teaspoon kosher salt
1 1/2 pounds unsalted butter, at room temperature
3 teaspoons pure vanilla extract

Chop the chocolates and place them in a heat-proof bowl set over a pan simmering water. Stir until melted and set aside until cooled to room temperature.

Mix the egg whites, sugar, cream of tartar, and salt in the bowl of an electric mixer fitted with a whisk attachment. Place the bowl of egg whites over the pan of simmering water and heat the egg whites until they are warm to the touch, about 5 minutes. Return the bowl to the electric mixer and whisk on high speed for 5 minutes, or until the meringue is cool and holds a stiff peak.

Add the butter, 1 tablespoon at a time, while beating on medium speed. Scrape down the bowl, add the melted chocolate, vanilla,and mix for 1 minute or until the chocolate is completely blended in. If the buttercream seems very soft, allow it to cool, and beat it again.

Spread on cake, serve, and enjoy!

Thursday, November 5, 2009

Thankful Thursday! Queasdillas-the sweet kind.

On this Thankful Thursday how can I not be grateful to my Dad for two things:


1. He restored my teeth. I now have my 4 crowns cemented and with a little time I think I will be as good as new.

2. He is the guy that really inspires me in the kitchen. He is always trying new things and is fearless with any dish! While visiting and getting my dental work done he made Prime Rib that was cooked better than anything Bobby Flay could of whipped up.

He also made a real tasty desert.

Picture a quesadilla with brie cheese and blue cheese crumbles melted inside with sauteed caramel apples drizzled on top. That is exactly what he made and boy was it delicious!


Ingredients:
1 tablespoon butter
1/4 cup brown sugar
1/4 teaspoon ground cinnamon
1 pound apples,peeled, cored, quartered and small diced
Pinch salt
1 tablespoon cornstarch
1 tablespoon water
For the quesadillas:
1/2 pound Blue Cheese, crumbled
1/2 pound Brie, thinly sliced
16 small flour tortillas
Vegetable oil for pan frying
For the walnuts:
1 cup walnut pieces
2 tablespoons cinnamon and sugar mixture
Directions
In a large saucepan, over medium heat, melt the butter. Stir in the sugar and cinnamon, stirring until the sugar dissolves. Add the apples and salt. Mix well. Cook for 4 minutes, stirring occasionally. Dissolve the cornstarch in the water. Stir the cornstarch slurry into the apples and continue to cook for 2 minutes. Remove from the heat and cool completely.


Place 1/2-ounce of the blue cheese and 1/2-ounce of the brie over half of each tortilla. Fold the tortillas over and press firmly. In a large saute pan, over medium heat, add 1 tablespoon of the oil. Add a third of the quesadillas and pan fry for a couple of minutes on each side until golden brown and the cheese is melted. Pan-fry the rest of the quesadillas in small batches.

Fry the walnuts for 1 minute. Remove and sprinkle with cinnamon sugar mixture. Drain on paper towels. Slice the quesadillas in half and serve with the apple compote and walnuts. Serve and enjoy!


Also good with pears!

Friday, October 16, 2009

Homemade Cinnamon Rolls (no frosting needed)

You don't understand what a big deal this is! I have always been afraid to make anything that requires yeast, raising, and that kneading business. Thanks to my mom's recipe and my dearest grandmother's guidance. I did it. They not only turned out, but were amazing. My husband proposed to me all over again. I'm sure every other "foodie" has made something like this, but if you ever wanted to know how, here are some instructions. These are a must have with your Fall and Winter soups.


Ingredients:

-2 pkgs dry yeast dissolved in 1/2 cup warm water (This is to 'proof' the yeast as well as to get it working) By proof, make sure the yeast is good yeast.
If it is the right temperature the yeast will start bubbling in about 5 min or so.
-2 cups warm buttermilk (I heat this in a pan on the stove, then add the sugar,oil,salt, and soda. The soda with buttermilk will foam up so have a pan big enough)
-1/2 cup sugar
-1/2 cup oil
-1 tsp soda
-1 1/2 tsp salt
-2 eggs, beaten
7 1/2 cups of flour (I did not use all of it)

For the Insides and Pan:
Brown Sugar
White Sugar
Butter
Karo syrup
Cinnamon
I did not give amounts as it is up to you and your taste. I used lots!

Directions:
-Combine in a large bowl (mixer bowl if you have one):
-2 cups warm buttermilk (I heat this in a pan on the stove, then add the sugar,oil,salt, and soda. The soda with buttermilk will foam up so have a pan big enough)
-1/2 cup sugar
-1/2 cup oil
-1 tsp soda
-1 1/2 tsp salt
-2 eggs, beaten
Add yeast mixture
-Add 7-71/2 cups flour and beat well. I add flour and beat in the electric mixer and when it is too stiff to mix, turn it out on the table and knead in the enough flour to make a soft dough reserving some to flour board when rolling for rolls.
-Cover dough, put in warm place like on the dryer or something until it has doubled in size.


While dough is raising-
Prepare your cookie sheets. Spread melted butter, brown sugar, and white Karo syrup into a gooey, lovely mess. This makes the sticky bun stuff.


Once dough has risen:
-Turn out on floured table or board and divide into two even-sized parts.
-Roll out long and about 4-5 inches in width. Roll pretty flat.
-Spread melted butter over and then sprinkle with brown sugar and white sugar and cinnamon to taste.(I use the white sugar to beef up the sweet along with the brown)
-Roll up and cut into rolls
-Place on prepared pans that have melted butter, brown sugar, and white Karo syrup drizzled on it. This makes the sticky bun stuff. I like to push each kind of flat since they raise so much and want them to be wider.
-Let raise again but not to twice the size since they will raise more in the oven.
-Bake 350 degrees until browned and done, about 1/2 hour.
-Turn out immediately on tinfoil or parchment paper. Serve and enjoy! They are best on the first day, but can be almost as good warmed up in the microwave after that. You can add frosting, but I never have.


See how the Karo syrup mixture just melts on and around those little lovelies? They are truly amazing. If I can do it, anyone can!

Monday, September 21, 2009

Simple Sunday Part One : Chocolate Chip Pumpkin Cookies

I unintentionally had a theme today. The theme was to use very little ingredients, but have a lot of taste!
First I made dessert. It is a good idea to make dessert first. It gives you something to nibble on while you are waiting for dinner to be done.

Pumpkin Chocolate Chip Cookies


Ingredients:
Take the above ingredients and mix together that is it!
1 can of Pumpkin
1 box of Spice Cake Mix
2 cups (more if you are me!) of chocolate chips

Directions:
Preheat oven to 350 degrees. Ignore directions on the box and simply add the pumpkin to the dry ingredients and stir together until thoroughly mixed. Add chocolate chips. Place ice cream scoop size dollops on greased cookie sheet. Bake for 12-15 minutes. It is really that easy and delicious! Serve and Enjoy!

Sunday, September 13, 2009

Peach Cupcakes with Brown Sugar Cream Cheese Frosting


I wish I could call this my own, but I owe it all to Smitten Kitchen. These are my new favorite cupcakes.

For the Cupcakes:
This recipe makes 28-32. It sounds like a lot, but once you have one you'll discover it is not nearly enough.

3 cups cake flour
1 1/2 teaspoons baking powder
1 1/2 teaspoons baking soda
1 teaspoon salt
Pinch of nutmeg
3/4 cup (1 1/2 sticks or 6 ounces) unsalted butter, at room temperature
3/4 cup granulated sugar
3/4 cup dark or light brown sugar, packed
2 large eggs, lightly beaten
1 teaspoon vanilla extract
1 1/2 cups (12 ounces) buttermilk, sour cream or full-fat yogurt
3 large peaches, peeled, cored, and chopped smallish (I went for a 1/3-inch dice)

Preheat the oven to 350°F. Line 28 muffin cups with paper liners.

Sift together the flour, baking powder, baking soda, salt and nutmeg and set aside. Cream the butter and sugars together, beating until fluffy. Add the eggs, one at a time, scraping down the sides and bottom of the bowl between each addition, and then the vanilla. Gently mix in the buttermilk, sour cream or yogurt. Stir in the dry ingredients and fold in the peach chunks.

Divide the batter evenly among the prepared cupcake liners. Bake for 18 to 22 minutes, or until a tester inserted into the center of cupcakes comes out clean. Cool the cupcakes for five minutes in the tin, then turn them out onto a wire rack to cool completely.

For the scrumptious frosting:

1 1/4 cups light brown sugar
1/4 cup cornstarch
1/2 cup powdered sugar
2 8-ounce packages of cream cheese, at room temperature
1/2 cup (4 ounces or 8 tablespoons) unsalted butter, at room temperature
1/2 teaspoon vanilla extract

In a small bowl, whisk together the brown sugar, cornstarch and powdered sugar. In a large bowl, beat the cream cheese and butter until fluffy. Add the sugar-cornstarch mixture and vanilla, beat until frosting is smooth and light. Chill the bowl in the refrigerator until it thickens back up a bit, about 30 minutes, then spread or dollop on cooled cupcakes.

Serve and enjoy, or use them to make friends.

Monday, September 7, 2009

Savory Crockpot London Broil


It was just one of those meals that was just really satisfying for a Sunday afternoon. I love the crockpot. It is perfect for cooking in Arizona.

1 1/2 to 2 pounds round steak
1 1/2 cups chopped onion
8 ounces sliced fresh mushrooms
1 package (about 1.5 ounces) dry stroganoff mix
1 package (about 2.75 ounces) country gravy mix (enough to make 2 cups)
1 can (10.5 ounces) condensed beef broth, undiluted
Dash pepper
1 teaspoon dried parsley flakes
Salt, to taste
2 Tbs. corn starch mixed with cold milk
Preparation:

Cut beef into 1/2-inch pieces. Sear in pan until just cooked. Combine in the slow cooker with the onions and mushrooms. Toss with the stroganoff and gravy mixes. Stir in the beef broth and wine; sprinkle with pepper and the parsley flakes. Add well mixed corn starch for thickening. Cover and cook for 7 to 9 hours; taste and add salt, as desired.
Serve with hot cooked rice, noodles, or potatoes, and a green vegetable or tossed salad.
Serves 4 to 6.


I also made orange glazed rolls with grapefruit zest instead of the standard orange zest. It was refreshing and the perfect touch for this meal.


Friday, June 12, 2009

Good Intentions: A story about Ice cream


I was invited to a function that requested everyone to bring a summer dish. Something that didn't require too much cooking or heating of the kitchen. I thought homemade Ice cream would be a nice treat. I first attempted to make Ice cream like I did as a girl where you put the ingredients in a plastic bag and then put that bag in a bigger bag full of ice and shake! 15 minutes later- Ice cream! Wrong! I ended up with water, milk, and a salty mess everywhere because the ice broke holes in the bag when I shook it up. So I went to Target to purchase an ice cream maker. I bought the inexpensive one that didn't require ice. I poured the ingredients in, turned it on, and went about my business. 40 minutes later I went to try out my finished product. Wrong! The machine never did it's thing because it broke shortly after I turned it on. Thus I went back to the store and purchased yet another ice cream maker. This time this machine needed ice and salt like the traditional Ice cream makers. Finally, success! It required 3 hours of babysitting, a couple times of emptying out the ice and starting over, and then finally I had ice cream!
I love this recipe it is light, sweet, and tangy all at once. A perfect summer treat. The trick is to keep it frozen as it melts fast. I was excited to take this to my gathering and have the women try it. I arrived early and stuck it in the freezer. I then had to go back home to feed my son before returning for the actual dinner. I made it back to a delightful dinner of several delicious salads and summer dishes. I was so excited to unveil my summer treat when the meal was over. I told the ladies around me to make sure they tried my ice cream before it melted as I was about to get it out of the freezer. I went to the freezer and the ice cream was gone. I went back to the table and discovered my Ice cream had been on the table the whole time. I just hadn't noticed it. Someone had taken it out of the freezer and set it next the fruit mistaking it for a dessert. It was of course I big melted mixture of cream. I am not sure if the lesson I am supposed to learn is to give up on making ice cream, but I don't think I can. Especially when there is this recipe in my possession. I wish you better luck with yours! As always, serve and enjoy!

Summertime Ice cream

3 cups sugar 3 Lemons (squeezed)

1 Qt Cream 3 Oranges (squeezed)

1 Qt Milk 3 Bananas (processed in food processor)


Combine all Ingredients and pour into your Ice cream maker.

Thursday, June 4, 2009

Lemon Cupcakes with Strawberry Frosting


I searched and searched for the perfect lemon cupcake for my sister's birthday

Thanks to http://beantownbaker.blogspot.com

lemon Cupcakes - from A Good Appetite - makes 6 (I tripled to make 18)

2/3 c all-purpose flour

1/4 t baking soda

1/4 t baking powder

pinch of salt

3 T unsalted butter, softened

1/3 c sugar

1 large egg, lightly beaten

zest of one lemon

juice of one lemon

1/4 c plain yogurt


Preheat oven to 350 and prepare muffin tins.


Stir flour, baking soda, baking powder and salt together. Set aside.

Beat the butter until light and fluffy. On high speed, gradually beat in the sugar until light & fluffy. Lower speed and add egg, beating until just blended. Then beat in lemon zest & lemon juice. On low speed beat in flour mixture & yogurt until just blended. This will be a very light fluffy batter.

Bake for 18 minutes. The edges should just be turning golden brown. Let cool on wire rack.

For the Frosting
3/4 cup of butter
1/4 cup milk
1/4 cup strawberries ( I processed them in the food processor, worked like a charm!)
4-5 cups powdered sugar (depending on how runny you like it with the strawberry puree)

Verdict: I am not a huge fan of lemon, but I am starting to love it. This was a great combination with the tart of the lemon mixed with the sweet of the strawberry. Serve and Enjoy!

Saturday, May 2, 2009

Banana Cupcakes with Caramel Cream Cheese Frosting


My first cupcakes! I'm still on the banana kick and wanted to make cupcakes for my husband's coworkers. I would like to say thank you to CREAM PUFFS IN VENICE for this delicious recipe for the frosting. I didn't use the cupcake recipe however, I used a basic banana cupcake recipe.

Banana cupcakes: makes 12
* 1 1/2 cups all-purpose flour (spooned and leveled)
* 3/4 cup sugar
* 1 teaspoon baking powder
* 1/2 teaspoon baking soda
* 1/4 teaspoon salt
* 1/2 cup (1 stick) unsalted butter, melted
* 1 1/2 cups mashed bananas (about 4 ripe bananas), plus 1 whole banana, for garnish (optional)
* 2 large eggs
* 1/2 teaspoon pure vanilla extract


Directions

1. Preheat oven to 350 degrees. Line a standard 12-cup muffin pan with paper liners. In a medium bowl, whisk together flour, sugar, baking powder, baking soda, and salt.
2. Make a well in center of flour mixture. In well, mix together butter, mashed bananas, eggs, and vanilla. Stir to incorporate flour mixture (do not overmix). Dividing evenly, spoon batter into muffin cups.
3. Bake until a toothpick inserted in center of a cupcake comes out clean, 25 to 30 min. Frost, serve, and enjoy!


For the Frosting: (thanks to Cream Puffs in Venice)


First the caramel sauce:

* 2 cups whipping cream
* 1 cup (packed) dark brown sugar
* 1/4 cup (1/2 stick) unsalted butter


Bring cream, brown sugar and butter to boil in heavy medium saucepan over medium-high heat, stirring frequently. Reduce heat to medium-low and simmer sauce until reduced to 1 3/4 cups, stirring occasionally, about 15 minutes. (Can be prepared 1 day ahead. Cover and refrigerate. Before using, rewarm over medium-low heat, stirring frequently.)

When cooled, add caramel sauce to the frosting:

1 pckg. cream cheese (8 ounces), at room temperature
1/2 cup unsalted butter, at room temperature
1/4 cup caramel sauce
2 tsp. vanilla extract
1 cup icing sugar

In the bowl of a stand mixer fitted with the paddle attachment, beat the cream cheese and butter together at high speed until light (about 2 minutes).

Lower the speed and add the vanilla extract and caramel sauce. Mix well.

With the speed on low, add the icing sugar until incorporated and then increase the speed to high and whip the frosting for 2 minutes.


I don't have the fanciest baking equiment so I used my son's medicine dropper to apply little caramel dots to the cupcakes from the leftover caramel sauce.

My verdict: I thought that banana and caramel would be a fantastic combination, but I have to say I was slightly disappointed. I think the cupcake needed to be a little bit sweeter to go with the cream cheese frosting. Otherwise they were a big hit!

Monday, April 27, 2009

Banana Bread! That is all that is left my friends!


Sunday is my favorite day to cook and I just wanted an easy dessert. You can tell by my other recipes that I love easy! So this banana bread was delicious and I mostly did it while sitting on the couch with my husband. After spending a few minutes sitting mashing bananas I just added some ingredients here there while stirring and then threw it in the oven. I will give credit for this snazzy recipe to Simply Recipes.


Ingredients

* 3 or 4 ripe bananas, smashed ( I used 5 bananas)
* 1/3 cup melted butter
* 1 cup sugar
* 1 egg, beaten
* 1 teaspoon vanilla
* 1 teaspoon baking soda
* Pinch of salt
* 1 1/2 cups of all-purpose flour

Method

No need for a mixer for this recipe. Preheat the oven to 350°F (175°C). With a wooden spoon, mix butter into the mashed bananas in a large mixing bowl. Mix in the sugar, egg, and vanilla. Sprinkle the baking soda and salt over the mixture and mix in. Add the flour last, mix. Pour mixture into a buttered 4x8 inch loaf pan. Bake for 1 hour. Cool on a rack. Remove from pan and slice to serve. I smeared it with butter and added a tall glass of milk. As always, serve and enjoy!

The only dilemna I had was with the baking. I cooked as instructed and it baked everywhere but the middle. I finally had to wrap tinfoil around the edges to stop the burning and cook a little longer. Any tips or suggestions for this would be appreciated.

Saturday, April 11, 2009

Some Facts about Peeps!


(thanks to wikipedia)
Happy Easter!
Did you know Rodda Candy Company originally started Peeps in the 1920s? In 1958 Just Born acquired the Rodda Candy Company and that is where we get the Peeps we enjoy today.

Originally each Peep was hand made which took nearly a day to complete. Today there is of course a machine that pipes out these tasty treats by the millions.

There are orange Peeps for Halloween,strawberry and vanilla Peeps for Valentines Day, and even sugar cookie flavors for Christmas.

This year Just Born candy company has just released Peeps lip balm! Check your local target if interested.
Thanks to the official Peeps website:
I found this delicious recipe with Peeps!
Ingredients:
• PEEPS® Orange Marshmallow Chicks
• 10 large naval oranges
• 4-1/2 cups heavy whipping cream
• 1 cup confectioners’ sugar
• 1/3 cup orange juice
• 2-1/4 tsp. orange extract
• 1 spring mint (optional)
Directions:
1. Cut a thin slice of the rind off the bottom of each orange so it sits flat.
2. Cut off the top 1/3 of each orange. With a grapefruit spoon, scoop out pulp. Invert
oranges onto paper towels to drain. Remove and discard membrane from orange pulp;
set aside.
3. In a mixing bowl, beat cream until it begins to thicken. Add confectioners’ sugar and extract; beat until stiff peaks form. Beat in orange juice. Fold in reserved orange pulp.
4. Spoon into orange shells. Cover and refrigerate until serving. Before serving, top each with a PEEPS® Orange Marshmallow Chick and a sprig of mint.
Makes 10, Serve and Enjoy!

Friday, April 10, 2009

Did you say you love coconut?


Coconut Creme Cake

Ingredients:
Please Follow the directions below, not the box of cake mix.
1 white cake mix
2 eggs
1 1/2 cup water
8 oz Cool Whip
2 cups cream of coconut


Directions:
Mix cake mix, water, eggs and 1 cup of creme coconut in mixer. Batter will be runny. Bake 350 for 30 min.
Poke holes in cake with fork and pour 1/2 cup coconut creme over cake. Put in frig.
Mix cool whip with remaining 1/2 cup coconut creme.
Spread on cake.
Keep in frig.
Better the next day. Serve and Enjoy!

Thursday, April 2, 2009

Crepes (Norwegian pancakes)


This is a favorite in my household. I grew up having these almost every Saturday. I know a lot of places carry special syrups to put on such as coconut creme, strawberry, and other delicious syrups, but I prefer butter with rasberry or strawberry jam. Sometimes I even put peanut butter instead of butter for a more filling crepe. Once your topping is spread on top, roll up and sprinkle with a small amount of powdered sugar. I have also taken left over crepes and filled with icecream and banans. I then freeze them and top with caramel sauce and whip cream. Serve and enjoy!
Ingredients:
2 eggs
1 TBS cooking oil
1/2 tsp salt
2 cups flour
2 1/2 cups milk
1/3 cup sugar
1 tsp vanilla

Directions:
In blender: blend eggs & sugar. Add oil, vanilla & salt. Alternate adding a little at a time: flour & milk until blended well.
On giddle or fry pan put a little butter or spray with pam. Pour batter on pan and lift and tilt around in circle to make a large thin pancake. Cook until slightly browned and turn and brown other side.

Tuesday, March 24, 2009

Brownie Chocolate Chip Cheesecake


I was intimidated with making a cheesecake and the springform pan idea, but it ended up being very easy and delicious.
1 small (10 ounce) package fudge brownie mix
3 (8 ounce) packages cream cheese, softened
1 (11 ounce) can sweetened condensed milk
3 eggs
2 teaspoons vanilla
1/2 cup mini chocolate chips

Preheat oven 350 degrees. Grease bottom of 9 inch spring form pan. Prepare brownie mix as package directs. Spread in pan and bake 35 minutes, or until set. Remove from oven and set aside. While brownie mix is baking, beat cream cheese in large mixing bowl until fluffy. Gradually add condensed milk, mixing well. Add eggs and vanilla, mixing until well blended. Stir in chips. Pour mixture over brownie shell. Reduce oven temperature to 300 degrees. Bake 50 to 60 minutes, until center is set. Allow to cool, then chill thoroughly in refrigerator. Serve and enjoy!

Raw Spice Bar

Raise your hand if you love to cook, but find yourself just finishing up your 8,987th meal and you are fresh out of ideas. Just me?  I h...